Auctions
Automate your auction compliance and nonprofit payouts by integrating your platform with Change
This guide will walk through each step of integrating an auctions platform with Change.
1. Create a Change account
Sign up for Change, then visit the Developers page. Click the “View test keys” switch to see your sandbox keys. Use these keys while building and testing your Change integration.
2. Add a Partner
Partners are nonprofits that benefit from your auctions. Visit the Partners page of your dashboard and click “+ Add partner” to add a partner. For the nonprofit partner to receive your auction proceeds, they’ll also need to create an account on Change. If they haven’t already joined Change, you’ll be given the option to send them an invite immediately. You can do so or choose to skip this invitation and proceed with creating your campaign. If you’re just building and testing, we recommend skipping the invitation step for the moment.
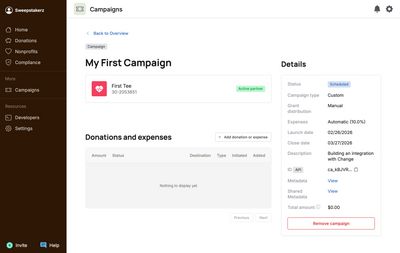
3. Create a Campaign
Campaigns represent your auctions, in which proceeds will be paid out to a single nonprofit and fees/expenses are returned to you. Campaigns can be created and edited via API, or via the Campaigns page in your Change dashboard.
There are four main types of campaigns: Gross, Net OCF, Net PF, and Custom. Use the following criteria to determine which type works best for your use-case.
Gross Create via dashboard only
You know your professional fundraiser fee or expenses in advance, as a percentage of donation dollars. Grant funds can be disbursed to the nonprofit as soon as Change receives them.
Net OCF Create via dashboard only
You do not know your total expenses in advance. You want Our Change Foundation (OCF) to hold onto all funds until you finalize your expenses. At that point, Change will return your expenses and disburse funds to the nonprofit.
Net PF Create via dashboard only
You do not know your total expenses in advance. You want OCF to return all funds to you throughout the campaign so you can hold onto them until you finalize your expenses. At that point, Change will pull the finalized grant amount from you and disburse funds to the nonprofit.
Custom Create via API or dashboard
You do not need per-nonprofit statements of work (you’ve worked with Change to develop this approach). Or, you want to fine-tune your campaign’s behavior.
Create via Dashboard
Create a campaign via Dashboard by visiting the Campaigns page. Click “+ New campaign”. Follow the prompts to create your campaign. Every campaign requires a campaign name, start date, end date, description, campaign type, and a partner.
If your campaign is of type Gross, Net OCF, or Net PF, you’ll also be required to create a statement of work describing your partnership. You’ll be required to add your professional fundraising fee, partnership start date, partnership end date, and signer information. A contract will be generated and sent to you and OCF for signature.
If your campaign is of type Custom, no statement of work is needed.
Once you’ve created a campaign, you can find it in the Dashboard by visiting the Campaigns page and clicking on your campaign. Here, you’ll find everything related to your campaign, including an ID (on the right-hand side) that you can use to reference your campaign via API.
Create via API
Create an custom campaign via API using the Create a campaign endpoint. A request may look like this:
curl https://api.getchange.io/api/v1/campaigns \
  -u YOUR_PUBLIC_KEY:YOUR_SECRET_KEY \
  -H "Content-Type: application/json" \
  -d '{
        "name": "Test Campaign",
        "start_date": 1769099675,
        "end_date": 1797957275,
        "nonprofit_id": "n_IfEoPCaPqVsFAUI5xl0CBUOx",
        "percent_auto_return": 67,
        "auto_distribute_grants": true,
        "metadata": {
          "internal_id": "1234567890"
        },
        "shared_metadata": {
          "markets": "CA, NY, TX"
        }
      }'
The response looks like this:
{
  "id": "ca_qGuqQsTMns",
  "name": "Test Campaign",
  "description": null,
  "nonprofit_id": "n_IfEoPCaPqVsFAUI5xl0CBUOx",
  "nonprofit_invited": false,
  "end_date": 1769099675,
  "start_date": 1797957275,
  "auto_distribute_grants": true,
  "grant_distribution_date": null,
  "percent_auto_return": "67.0",
  "metadata": {
    "internal_id": "1234567890"
  },
  "shared_metadata": {
    "markets": "CA, NY, TX"
  },
  "grant_distribution_statuses": []
}
Note that the ID returned in this response can be used to reference this campaign going forward. For example, later, when you create a donation for this campaign via API, you’ll use the ID to specify which campaign the donation is for.
Whether you create your campaign via Dashboard or API is up to you and your organization’s needs.
4. Create a donation
Campaign donations are donations to OCF that will be split into expenses (returned to you) or grants (sent to nonprofits) based on your campaign’s rules. You can add donations to a campaign via Dashboard or API. Donations are pulled daily from your bank account by OCF.
Create via Dashboard
To add a single donation to a campaign, find your campaign in the dashboard by visiting the Campaigns page and clicking on your campaign. On that page, click “+ Add donation or expense”. A form will appear, and you can use it to add a donation to the campaign.
To add many donations at once, visit the Campaigns page and click “+ Add payments”. You’ll be presented with a CSV template and a file upload. Copy the CSV template to a sheet and add the donations you’d like to upload. When you’re done, save the file as a CSV, and upload it to the form.
Create via API
Create a campaign donation via API using the Create a campaign donation endpoint. Use your campaign’s ID in the request URL. A request may look like this:
curl https://api.getchange.io/api/v1/campaigns/ca_Us5hNaF8Ac/donations \
  -u YOUR_PUBLIC_KEY:YOUR_SECRET_KEY \
  -H "Content-Type: application/json" \
  -d '{
        "amount": 500
      }'
5. Create an expense (optional)
If your campaign is an Custom campaign or a Net OCF campaign, you can add ad-hoc expenses via Dashboard. Expenses are returned ASAP to you.
To add a single expense to a campaign, find your campaign in the dashboard by visiting the Campaigns page and clicking on your campaign. On that page, click “+ Add donation or expense”. A form will appear, and you can use it to add an expense to the campaign.
To add many expenses at once, visit the Campaigns page and click “+ Add payments”. You’ll be presented with a CSV template and a file upload. Copy the CSV template to a sheet and add the donations you’d like to upload. When you’re done, save the file as a CSV, and upload it to the form.