Donations API Tutorial
Looking to add donations in your app and don’t know where to start? Then look no further. The goal of this tutorial is to show you how to use the Donations API to create and retrieve donations. If you get stuck at any point you can always reach out at support@getchange.io or the chat link on this page. All the code in this tutorial can be found here.
💡 Before you continue, please make sure to sign up if you haven’t already at https://api.getchange.io/sign_up.
To kick off this tutorial, we are going to learn how to make POST API requests to Change to create a donation. We will then learn how to make GET API requests to retrieve our created donation and to view all donations we’ve created in the past. At the end, we will go over some more advanced features in the API: the external_id and metadata fields. These can make the development process easier and unlock key insights about your app.
Setting the scene
To help visualize the process of integrating donations into your app, we will be using code examples in Javascript running on the web application framework, Express (https://expressjs.com/). If you’ve never used Express before, follow these steps to get a basic Express app running: https://expressjs.com/en/starter/installing.html. Even though this tutorial is in JavaScript, these steps can be translated to any language/framework of your choice.
You should have an express application setup with the following directory structure:
node_modules/
app.js
package-lock.json
package.json
And your app.js file should look something like this:
const express = require('express')
// put your public and secret keys here
const public_key = // public_key
const secret_key = // secret_key
// setup express
const app = express()
const port = 3000
// parses JSON payloads
app.use(express.json())
app.get('/', (req, res) => {
res.status(200).json({
message: 'hello world!'
})
})
app.listen(port, () => {
console.log(`Donation app listening on port ${port}`)
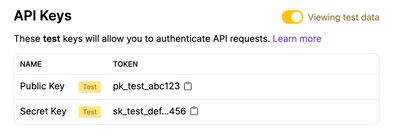
})💡 You can find the public_key and secret_key at https://api.getchange.io/test/developers. Keep in mind that these are your test keys. Production keys can be found at https://api.getchange.io/developers or by toggling the “Viewing test data” button in the API Keys section to switch to production mode.
Running node app.js in the root directory of your application should give the following:
donation-app % node app.js
Donation app listening on port 3000
And going to http://localhost:3000 in your browser should show the following:
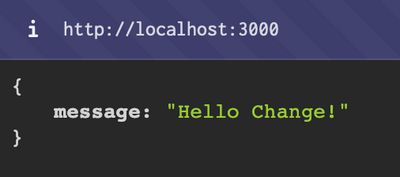
Once you see the above, we’re ready to start donating!
Making a donation
POST/api/v1/donations
To create a donation using Change, we’re going to make a POST API request to Change using Javascript’s fetch API. Let’s make a new endpoint called /donate and populate the function with the following code:
app.post('/donate', (req, res) => {
  fetch('https://api.getchange.io/api/v1/donations', {
    method: 'POST',
    headers: {
      'Authorization': 'Basic ' + Buffer.from(public_key + ":" + secret_key).toString('base64'),
      'Content-Type': 'application/json',
    },
    body: JSON.stringify({
      amount: 500,
      nonprofit_id: 'n_OdoHlOZvrdJ0skpDC1AD7qL2',
      funds_collected: false
    })
  })
    .then(response => response.json())
    .then(data => res.status(200).json(data))
    .catch(error => res.status(500).json(error))
})
Let’s break down what’s happening in this function:
- We’re creating a
POSTAPI endpoint with the path/donate - In the callback function which is triggered when a
POSTrequest is made to/donatewe are making aPOSTrequest to Change’s donation endpointhttps://api.getchange.io/api/v1/donations - In the body, we are specifying the donation parameters of:
amount: 500the donation amount in cents ($5.00)nonprofit_id: n_OdoHlOZvrdJ0skpDC1AD7qL2the unique identifier of the nonprofit in Change’s dashboard (Black Girls Code - https://api.getchange.io/nonprofits/n_OdoHlOZvrdJ0skpDC1AD7qL2)funds_collected: falsewhether you are collecting payment for the donation (this is for tax purposes at the end of the year - if you were making this donation on someone else’s behalf this value would be set totrue
- After the
fetchrequest is made, we parse the response body and return it to the client making the request
💡 To find a nonprofit_id in Change’s dashboard, use the nonprofit navigation at https://api.getchange.io/nonprofits to search for the nonprofit you’d like to donate to. The nonprofit_id can be found in the URL of the nonprofit’s profile page or on the nonprofit profile labeled “Nonprofit ID”.
Now that your app has all the code it needs, let’s run this thing. In your terminal, restart your instance using CTRL + C and node app.js . Restarting lets Express know that you’ve made changes to your app and it needs to reflect those changes. If this seems too tedious, you can look into the node package nodemon (https://github.com/remy/nodemon) which will automatically restart your server when you save files.
donation-app % node app.js
Donation app listening on port 3000
^C
donation-app % node app.js
Donation app listening on port 3000
💡 If you run into the error ReferenceError: fetch is not defined it means your Node version is too low! fetch is only available for Node versions 16 or greater. To check your Node version you can run the command node --version in your terminal. Either install Node version 16 or greater or use the node package node-fetch (https://github.com/node-fetch/node-fetch).
Once your server is up and running, we can try hitting the endpoint. Open up a new terminal window (without exiting the server) and run:
donation-app % curl -X POST http://localhost:3000/donateIf you see the response below, then congrats! You just made a donation using Change! 🥳
{
	"amount":500,
	"id":"d_t2mv7cRKPwMALE8NCKZIrO4I",
	"live_mode":false,
	"nonprofit_id":"n_OdoHlOZvrdJ0skpDC1AD7qL2",
	"order_value":null,
	"zip_code":null,
	"external_id":null,
	"metadata":{},
	"currency":"USD"
}
The response JSON contains details about the donation you just made, for now the most important fields are:
amount(Number) the amount of the donation in centsid(Number) the unique identifier of the donation you’ve just createdlive_mode(Boolean) a boolean which declares if this donation was made in our test or production environmentcurrency(String) although not specified, donations made through the API endpoint will always beUSD.
To check that your donation has gone through, you can view recent donations made on your developer page at https://api.getchange.io/test/developers.

To make the nonprofit and donation amount dynamic we can modify our function to use arguments from our POST request. Let’s modify our function to look like this:
app.post('/donate', (req, res) => {
  const { amount, nonprofit_id, funds_collected } = req.body

  fetch('https://api.getchange.io/api/v1/donations', {
    method: 'POST',
    headers: {
      'Authorization': 'Basic ' + Buffer.from(public_key + ":" + secret_key).toString('base64'),
      'Content-Type': 'application/json',
      'Accept': 'application/json'
    },
    body: JSON.stringify({
      amount: amount,
      nonprofit_id: nonprofit_id,
      funds_collected: funds_collected
    })
  })
    .then(response => response.json())
    .then(data => res.status(200).json(data))
    .catch(error => res.status(500).json(error))
})
And now our POST request is dynamic!
donation-app % curl -X POST http://localhost:3000/donate    \
							   -H "Content-Type: application/json" \
							   -d '{"amount": 1000, "nonprofit_id": "n_OdoHlOZvrdJ0skpDC1AD7qL2", "funds_collected": false }'
You should see the response below:
{
	"amount":1000,
	"id":"d_dk7HJ5MhAesMAg0mFxjm7Bry",
	"live_mode":false,
	"nonprofit_id":"n_OdoHlOZvrdJ0skpDC1AD7qL2",
	"order_value":null,
	"zip_code":null,
	"external_id":null,
	"metadata":{},
	"currency":"USD"
}
And that’s it for making a donation! Congrats on making it this far! In the upcoming sections, we’re going to go over how to retrieve donations we’ve made via the Change API, and talk about some of the other fields in the donation JSON response object above, such as external_id and metadata.
For more formal documentation on everything our POST /donate API can do, go to: https://docs.getchange.io/api/#Donations
Retrieving donations
Next, we’re going to go over how to retrieve a donation we just created. Going back to our express file app.js, let’s create a new endpoint, GET /donation/:id:
app.get('/donation/:id', (req, res) => {
  console.log(req.id)
  fetch(`https://api.getchange.io/api/v1/donations/${req.params.id}`, {
    method: 'GET',
    headers: {
      'Authorization' : 'Basic ' + Buffer.from(public_key + ":" + secret_key).toString('base64'),
      'Accept': 'application/json'
    }
  })
    .then(response => response.json())
    .then(data => res.status(200).json(data))
    .catch(error => res.status(500).json(error))
})
In the previous endpoint we used the request body to make a request to our server. In this case, since we are making a GET request, we have to use a request parameter which is contained within the URL of the request.
Using our trusty terminal once again, we’re going to make a cURL request which hits the GET API endpoint we just created. Make sure to include the id at the end! You can get the donation ID from making a POST request in the previous section.
donation-app % curl http://localhost:3000/donation/<id>You should see the response below:
{
	"amount":1000,
	"id":"d_dk7HJ5MhAesMAg0mFxjm7Bry",
	"live_mode":false,
	"nonprofit_id":"n_OdoHlOZvrdJ0skpDC1AD7qL2",
	"order_value":null,
	"zip_code":null,
	"external_id":null,
	"metadata":{},
	"currency":"USD"
}
Amazing! Change makes it easy to retrieve details about donations you’ve made previously. This is super helpful for showing customers donation data such as how much has been donated on their behalf!
Moving quickly to the next step, let’s set up an endpoint to retrieve ALL donations we’ve made. Once again, let’s create another endpoint:
app.get('/donations', (req, res) => {
  // do your business logic here

  fetch(`https://api.getchange.io/api/v1/donations`, {
    method: 'GET',
    headers: {
      'Authorization' : 'Basic ' + Buffer.from(public_key + ":" + secret_key).toString('base64'),
      'Accept': 'application/json'
    }
  })
    .then(response => response.json())
    .then(data => res.status(200).json(data))
    .catch(error => res.status(500).json(error))
})
This time the cURL request is straightforward:
donation-app % curl http://localhost:3000/donationsYou should see the response below:
{
  "donations": [
    {
	    "amount":1000,
	    "id":"d_dk7HJ5MhAesMAg0mFxjm7Bry",
	    "live_mode":false,
	    "nonprofit_id":"n_OdoHlOZvrdJ0skpDC1AD7qL2",
	    "order_value":null,
	    "zip_code":null,
	    "external_id":null,
	    "metadata":{},
	    "currency":"USD"
    },
    {
	    "amount":500,
	    "id":"d_t2mv7cRKPwMALE8NCKZIrO4I",
	    "live_mode":false,
	    "nonprofit_id":"n_OdoHlOZvrdJ0skpDC1AD7qL2",
	    "order_value":null,
	    "zip_code":null,
	    "external_id":null,
	    "metadata":{},
	    "currency":"USD"
    }
  ],
  "page": 1
}
We are cruising 🚗 through these endpoints!
With Change, you can easily retrieve all of the donations you’ve made in the past! Being able to retrieve all of your donations via API makes performing data analysis a breeze.
💡 We understand that handling data via API isn’t ideal for everyone, which is why we’ve placed an “Export” button on your donations page https://api.getchange.io/test/donations/ledger allowing you to download all of your donation data via CSV 😃
And that’s pretty much all you need to get started with Change’s APIs! Congratulations! 🎉 You’ve successfully integrated donations! For the rest of this post, we will be digging into some more advanced features of Change’s APIs: external_id and metadata.
Leveling Up Your Donation Game ⬆️
POST/api/v1/donationsGET/api/v1/donations
To round the final corner of this guide, we’re going to revisit the APIs we’ve already seen and go over some features which we initially glazed over. I will also be giving example scenarios as to why you might want to include these features in your application!
Both external_id and metadata are fields you can add when creating a donation and will be stored with your donation. While external_id takes a string, metadata uses an object to store as much additional information as you want on the donation. The only other difference between the two fields is that you can filter your donations via external_id when retrieving donations via API while metadata is exclusively used for additional details. We will go over some examples to solidify these topics.
Scenario
We are an online business selling different types of tea. For each bag of green tea purchased, we will donate $1 to Black Girls Code. If it’s any other kind of tea purchased, we will only donate $0.50 to Black Girls Code. Let’s design an endpoint which is hit when a customer buys tea:
app.post('/donate', (req, res) => {
  const types = ['jasmine', 'green', 'black', 'oolong']
  const { type, customer_id } = req.body
  if (!types.includes(type)) return res.status(400).json({message: 'invalid tea type'})
  // update our database with a new purchase of tea of type 'type'
  fetch('https://api.getchange.io/api/v1/donations', {
    method: 'POST',
    headers: {
      'Authorization': 'Basic ' + Buffer.from(public_key + ":" + secret_key).toString('base64'),
      'Content-Type': 'application/json',
      'Accept': 'application/json'
    },
    body: JSON.stringify({
      external_id: customer_id, // we can use this to track customers
      amount: type === 'green' ? 100 : 50, // $1 if green tea, 50 cents otherwise
      nonprofit_id: "n_OdoHlOZvrdJ0skpDC1AD7qL2", // Black Girls Code nonprofit ID
      funds_collected: false, // we are donating this money, not the customer
      metadata: {
        tea_type: type // we can use this to track tea types
      }
    })
  })
      .then(response => response.json())
      .then(data => res.status(200).json(data))
      .catch(error => res.status(500).json(error))
})
Great, now let’s try it out! Based off the code it looks like our POST /tea request takes in two payload fields: type of value jasmine, green, black, or oolong and customer_id which will be the ID of the user in our system. In our case we will just use the ID c_123.
donation-app % curl -X POST http://localhost:3000/donate    \
							   -H "Content-Type: application/json" \
							   -d '{"type": "green", "customer_id": "cus_123" }'
You should see the response below:
{
"amount":100,
"id":"d_7RgHPINvr86wHBGC8aBGXkFV",
"live_mode":false,
"nonprofit_id":"n_OdoHlOZvrdJ0skpDC1AD7qL2",
"order_value":null,
"zip_code":null,
"external_id":"c_123",
"metadata":{
"tea_type":"green"
},
"currency":"USD"
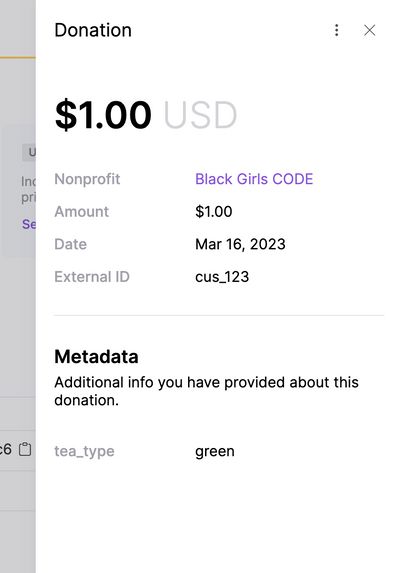
}As you can see, our returned donation object now has values for fields external_id and metadata! If you click on your latest donation either on https://api.getchange.io/test/developers or https://api.getchange.io/test/donations/ledger you will see the donation you just created, as well as the external_id and metadata fields you’ve supplied.
Storing this data in Change allows you to come back and retrieve it when your system is ready and allows Change to do more with your donation data. Take for example the GET /donations endpoint we were using previously. Now that you’ve supplied a donation with an external_id, you can specifically query the GET /donations endpoint for donations with that external_id! Since we supplied our customer ID cus_123 as the external_id, we can now retrieve all donations a customer has contributed to! Create a new endpoint called /tea-donations:
app.get('/tea-donations', (req, res) => {
  const allowedKeys = ['nonprofit_id', 'external_id', 'start_timestamp', 'end_timestamp']
  const filteredParams = {};
  var querystring = require('querystring');
  for (const key in req.query) {
    if (allowedKeys.includes(key)) filteredParams[key] = req.query[key]
  }
  fetch(`https://api.getchange.io/api/v1/donations?${querystring.stringify(filteredParams)}`, {
    method: 'GET',
    headers: {
      'Authorization' : 'Basic ' + Buffer.from(public_key + ":" + secret_key).toString('base64'),
      'Accept': 'application/json'
    }
  })
    .then(response => response.json())
    .then(data => res.status(200).json(data))
    .catch(error => res.status(500).json(error))
})
And as always run the cURL request:
donations-app % curl -G http://localhost:3000/tea-donations --data-urlencode "external_id=cus_123"You should see the response below:
{
	"donations":[
		{
			"amount":100,
			"id":"d_7RgHPINvr86wHBGC8aBGXkFV",
			"live_mode":false,
			"nonprofit_id":"n_OdoHlOZvrdJ0skpDC1AD7qL2",
			"order_value":null,
			"zip_code":null,
			"external_id":"cus_123",
			"metadata":{
				"tea_type": "green"
			},
			"currency":"USD"
		}
	],
	"page":1
}
The above request URL is equivalent to http://localhost:3000/tea-donations?external_id=cus_123
As you can see, only the donations associated to cus_123 were returned and none of the donations we made previously. GET /donations has other built in query parameters such as nonprofit_id, start_timestamp, and end_timestamp . Check them out at the docs here: /api/v1/donations.
And that’s it for external_id and metadata. Thanks for making it all the way here! Change is constantly iterating on top of our core APIs so stay tuned as we add more ways to utilize the external_id and metadata fields to unlock even more insights for our customers.
Last but not least, moving to production…
All these APIs are great and all but don’t serve much purpose if they’re all made in test mode. But don’t worry – we make switching to production donations easy! Simply swap out your test keys for the production keys here: https://api.getchange.io/developers. And you’re done! It’s as simple as that. Now all your API requests will be made in production instead of in test mode!
And that wraps things up! Make yourself a nice cup of green tea 🍵 (or whatever your cup of tea is) as a treat for making it to the end! Thank you for reading and happy donating! ❤️
You can find the entire repo for this post at https://github.com/get-change/donations-api-tutorial and as always, if you have any more questions, feel free to click the chat button on this page! ✌️😎