Impact Stats Tutorial
Have you ever wondered what impact your donation has? Change makes it easy to integrate impact stats into your application! In this tutorial, we will entice the customer to make a donation by revealing the impact their donation would have.
Set Up
In this tutorial, we will be using replit to demonstrate how to integrate impact stats using the Change API. What do I download? Nothing! Replit is a coding environment that is opened on your browser - it’s as simple as that.
- First, make a replit account at https://replit.com/~.
- Once you make an account, navigate to this link to access the skeleton repl: https://replit.com/@EpicSRN2016/Impact-Stats-Tutorial?v=1.
- Once you navigate to the repl, click the fork button at the top right hand corner next to the run button. This will make your own copy of the repl code.
Thats it! You now have a copy of the starter code. If you want to jump straight to the solution, fork this repl: https://replit.com/@EpicSRN2016/Impact-Stats-Tutorial-Solution?v=1.
For this tutorial, we will be using Next.js, a react framework, but also keep in mind that Change works with any environment!
Next (no pun intended), if you have not already, sign up for a change account. Then, find your API keys here. Remember to toggle “Viewing test data” to get your test keys.
Now in the repl code, navigate to pages/api/index.tsx and add your test keys:
// Keep your Change Keys Here
const public_key = "pk_1234" // Replace with your public key
const secret_key = "sk_1234" // Replace with your secret key
Now you are ready to integrate impact stats using Change!
Integrate Impact Stats
In this tutorial, the only file we will be editing is index.tsx.
Every addition and modification in this tutorial is also commented in the code.
Let’s add a checkbox to give customers the option to make a donation with loyalty points alongside their purchase. Scroll down to the html code and add the checkbox:
{/* Add donation checkbox */}
<div className="dropdown">
    <label className="checkbox-label" htmlFor="select"><input id="donateCheckbox" type="checkbox" name="donate" className="checkbox-box" /><span className="checkbox-check"></span>Donate </label>
    <select name="points" id="select" onChange={handleSelectChange}>
        <option value="5" >5</option>
        <option value="50">50</option>
        <option value="100">100</option>
        <option value="500">500</option>
    </select>

    <label> Points to <a href="https://onetreeplanted.org/">One Tree Planted Inc</a></label>
</div>
<div className="impact">
    {impact}
</div>
💡 Anytime your code gets messy, you can utilize replit’s format feature. This auto formats your code.
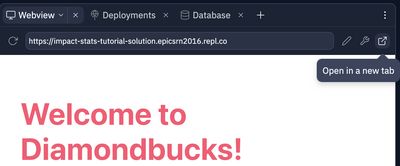
You can also view the webview output in a new tab.
Now, we can use Change API to reveal the impact of the donation to the customer. Modify the updateImpact function so that it looks like this:
// Configure updateImpact function
const updateImpact = (points) => {
fetch('https://api.getchange.io/api/v1/nonprofits/n_MUjmT5yhdf4smx1ykRwO2ovt', {
  method: 'GET',
  headers: {
    'Authorization': 'Basic ' + Buffer.from(public_key + ":" + secret_key).toString('base64'),
    'Content-Type': 'application/json',
  },
})
  .then(response => response.json())
  .then(json => {
    const stat = json.impact_stats[0];
    const impact_plural = stat.impact_plural;
    const impact = stat.impact;
    const price = stat.price;
    const amount = stat.amount;
    const quantitative_amount = ((points * 20) / price) * amount;
    if (quantitative_amount == 1) {
      setImpact("Your donation will plant " + quantitative_amount + " " + impact + "!");
    } else {
      setImpact("Your donation will plant " + quantitative_amount + " " + impact_plural + "!");
    }
  });
}
Let’s break down what is happening here.
The response JSON contains details about the nonprofit. We are using the information in json.impact_stats[0] because that is where the impact stats are contained. Here are descriptions of some of the impact stat fields:
amount(Number) the amount of trees planted forpricecentsimpact(String) the impact description for a donation to that non-profit. In this case, it is to plant a treeimpact_plural(String) plural version ofimpact
Now modify the handleSelectChange function:
// Configure select menu
const handleSelectChange = (event: React.ChangeEvent<HTMLSelectElement>) => {
  const selectedPoints = parseInt(event.target.value);
  setPoints(points);
  updateImpact(selectedPoints);
}

useEffect(() => {
  updateImpact(5);
}, []);
This function updates the impact statement based on what the customer selects in the dropdown menu.
Congrats! You just added impact stats to an application using Change!
Post a Donation
You probably notice that the pay button currently doesn’t do anything.
Now that we reveal the impact of a donation, we also need to allow the customer to make a donation. We can do this using the “Create a donation” endpoint.
Update the handleButtonClick function to look like this:
// Update pay button
const handleButtonClick = () => {
const checkbox = document.getElementById("donateCheckbox") as HTMLInputElement;
const selectedPoints = parseInt((document.getElementById("select") as HTMLInputElement).value);
if (!checkbox.checked) {
setStatus("Payment Successful");
return;
}
if (points < selectedPoints) {
setStatus("Not enough points!");
}
else {
setPoints(points => points - selectedPoints);
setStatus("Payment Successful");
fetch('https://api.getchange.io/api/v1/donations', {
method: 'POST',
headers: {
'Authorization': 'Basic ' + Buffer.from(public_key + ":" + secret_key).toString('base64'),
'Content-Type': 'application/json'
},
body: JSON.stringify({
amount: selectedPoints * 20,
nonprofit_id: "n_MUjmT5yhdf4smx1ykRwO2ovt",
funds_collected: false
})
});
}
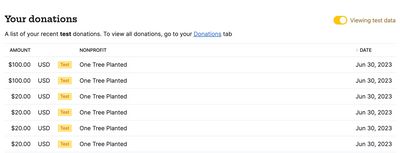
}It’s that easy! Now, each time the pay button is pressed, a donation is posted through a POST call. For this website, each point is equivalent to 20 cents. To check that your donation has gone through, you can view recent donations made on your developer page at https://api.getchange.io/test/developers.
Congratulations! You just successfully integrated impact stats to an application using the Change API.
Fetch Impact Report
One final thing to note, Change API also has a GET call specifically for impact stats. For this tutorial, we used the show a nonprofit GET call and filtered out results to only use impact stats. However, you can also use the fetch impact report call to get a report detailing the aggregated impact of all your donations.