Shopify Plus Integration
Add donations to your Shopify Plus store by integrating Change with serverless webhooks
This guide will walk through each step of integrating Change with your Shopify Plus store.
For Shopify Plus, we recommend a serverless approach. In this guide, we’ll use AWS Lambda to submit a donation whenever a customer makes a purchase.
1. Create a Change account
Sign up for Change, then visit the Developers page. Click the “View test keys” switch to see your sandbox keys. Use these keys while building and testing your Change integration. You’ll use your Change credentials when the Donation Lambda calls the Change API.
2. Deploy a Nonprofit Lambda
Your shop may want to donate to different nonprofits based on product. This product-to-nonprofit mapping is read at donation time. To avoid repeating that mapping in several places, keep the logic in its own service.
Create a Lambda with the following implementation:
const NONPROFITS = {
  'SKU_shoes': 42,
  'SKU_jacket': 123
};

exports.handler = async (event) => {
  const {skus} = event.queryStringParameters;
  return {
    statusCode: 200,
    nonprofit_ids: skus.map(sku => NONPROFITS[sku])
  }
};
For the rest of this guide, we’ll assume this Lambda is deployed and available at https://my.lambda/nonprofits.
3. Deploy a Donation Lambda
Create a second Lambda that verifies the request is from Shopify, resolves nonprofit IDs via your Nonprofit Lambda, and submits the donation to Change.
const crypto = require('crypto');

// Your webhook secret, available after creating a Shopify webhook.
SHOPIFY_SECRET = 'shhh';
// Your Change secret, available from your dashboard.
CHANGE_SECRET = 'shhh';

exports.handler = async (event) => {
  const {body, headers} = event;

  // Verify that the request is from Shopify.
  verified = verifySource(body, headers['X-Shopify-Hmac-SHA256']);
  if (!verified) {
    return { statusCode: 401 };
  }

  const order = JSON.parse(body);
  const skus = order.line_items.map(item => item.sku);

  // The nonprofit is determined by the Nonprofit Lambda.
  const nonprofitIDs = await fetch(`https://my.lambda/nonprofits?skus=${skus}`);

  // Submit the donation information to Change.
  submitDonations(order.id, nonprofitIDs);

  // Shopify expects a 200 response.
  return { statusCode: 200 };
};

async function submitDonations(orderID, nonprofitIDs) {
  await fetch('api.getchange.io/donations/create', {
    method: 'POST',
    headers: {'Content-Type': 'application/json'},
    body: JSON.stringify({
      amount: 1,
      nonprofit_ids: nonprofitIDs,
      order_id: order.id
    })
  });
}

function verifySource(data, hmacHeader) {
  const hash = crypto.createHmac('sha256', SHOPIFY_SECRET)
                     .update(data)
                     .digest('base64');
  return crypto.timingSafeEqual(hash, hmacHeader);
}
Donation funds processing: Whether API calls to /donations/create move donation funds or not depends on your business arrangement with Change.
For the rest of this guide, we’ll assume this Lambda is deployed and available at https://my.lambda/donation.
4. Create a Shopify webhook
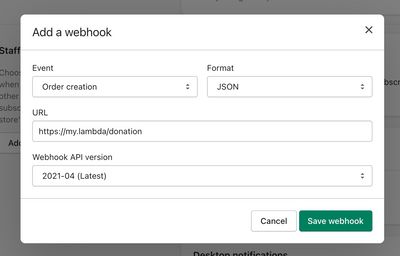
Add a webhook for Order creation.
In your Shopify admin, go to Settings > Notifications. Scroll to the bottom of the page and click Create webhook.
In the dialog, choose Event: Order creation, and enter your Donation Lambda URL—for example, https://my.lambda/donation. Click Save webhook.
Shopify will show a shared secret:

Copy the shared secret and set it as SHOPIFY_SECRET in your Donation Lambda:
// Your webhook secret, available after creating a Shopify webhook.
SHOPIFY_SECRET = 'your-shopify-secret';
Your webhook is ready to use.
Nonprofit ID in the theme
The nonprofit_id depends on which product is being or has been purchased. You can resolve it with the same Nonprofit Lambda you added earlier. If that Lambda is available at https://my.lambda/nonprofits, you can use a script like the following to populate nonprofit_id:
<script>
  const socialElement = document.querySelector('change-social-content');
  fetch('https://my.lambda/nonprofits?sku=[{checkout.line_items | map: "sku"}]')
    .then(JSON.parse)
    .then(result => {
      // If there are multiple line items, decide which one we should render
      // social media content for.
      socialElement.nonprofit_id = result[0];
    });
</script>